
How to Install 3D Floor Mats (and What to Check First)
Fitting a custom-cut set takes about ten minutes. Almost every problem people hit afterwards traces back to something they skipped in the first two.
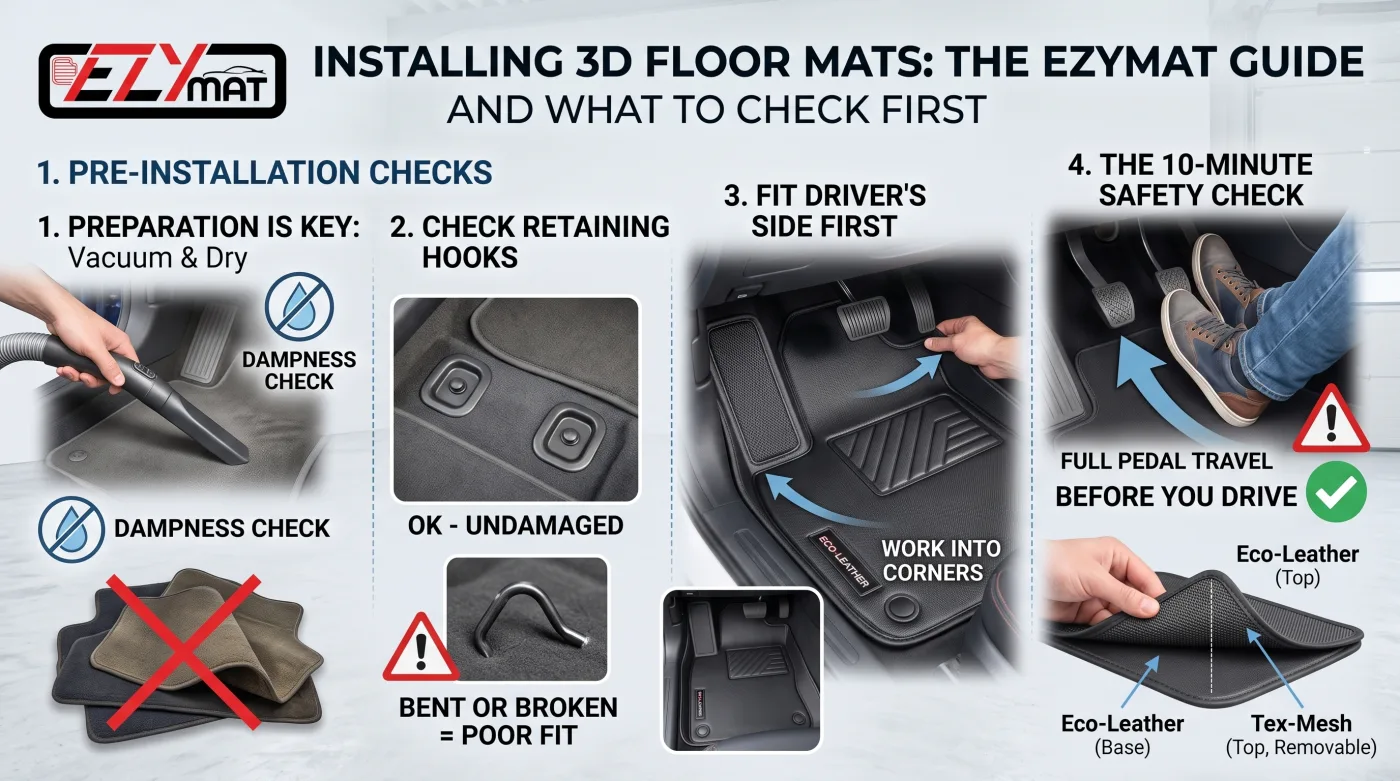
A custom-cut set is not a job that needs tools, a workshop, or an afternoon. It is a ten-minute job. What it does need is doing in the right order, because the two things people skip at the start are the two that cause every complaint afterwards.
Take the old mats out and look underneath
Not just out of the way — out of the car.
Whatever the old mats were hiding is still there: grit, sand, dried mud, and usually more moisture than you expect. Fitting a new set straight on top of that seals it in. The carpet underneath does not dry once a waterproof mat is sitting on it, and the smell that follows a couple of weeks later gets blamed on the new mats.
Vacuum the footwell, and if the carpet is damp at all, leave the car open until it is not. This is the step that costs nothing and prevents the most.
Check the retaining hooks
Most cars have one or two fixed hooks in the driver's footwell that a mat is meant to clip or sit over. They are a safety feature, not a convenience — they are what stops a mat sliding forward under the pedals.
Look at them before you fit anything. If a previous mat was forced over a hook, the hook can be bent or the collar cracked, and a mat that cannot seat properly on a damaged hook will not stay where you put it.
Fit the driver's side first
Always the driver's side, and always before the rest.
It is the piece with the least tolerance — it has to clear the pedals, seat the hooks and sit flat all at once — so if a set is going to be wrong for the car, this is where you find out. Working out from the driver's side means you notice a problem before you have laid the whole set in.
Lay it in, work it into the corners of the footwell rather than pressing down in the middle, and check the raised edge follows the shape of the well the whole way round. A custom-cut mat should not need to be forced anywhere. If it does, stop and check you have the right piece.
Then the front passenger, then the rear
The passenger side goes in the same way with more room to work.
For the rear, the base layer covers the whole rear floor. The top layer covers the left and right positions where feet actually land, and deliberately not the centre tunnel — nobody puts their shoes there, and covering it adds material that only gets in the way of the middle seat.
If your car is an MPV or a seven-seater, the set includes a third-row piece as well.
Understand the two layers before you use it
This is the part that most affects how the set behaves later.
The base is Eco-Leather, a solvent-free protein leather. It is the waterproof shell: it keeps water and mud off your original carpet and it wipes clean. It has an anti-slip backing, which is the other half of what the hooks are doing.
Over it sits Tex-Mesh — woven fibre with wear-resistant PVC — on the strip your shoes actually land on. That upper layer lifts out on its own.
That is deliberate. It means the part that gets dirty is the part you take out and rinse, and the waterproof layer underneath stays where it is. When you clean the set, you separate them; our guide to cleaning car mats covers how each layer is handled.
Check the pedals before you drive
With everything in, sit in the driver's seat and work all the pedals through their full travel. Full clutch, full brake, foot right down.
Then look at the mat. It should not have crept forward and there should be nothing near the pedal arms. Do this before you drive, not after you notice something on the road.
The mistakes worth avoiding
Stacking a new set on the old one. Two layers of mat raises the floor by more than people expect and puts material where the pedals travel. If the original mats are staying in the car, they belong in the boot, not under the new set.
Ignoring a mat that will not sit flat. A custom-cut piece that lifts at one corner is telling you something — usually that it is in the wrong footwell, or that there is still debris underneath. It is not something that beds in over time.
Fitting a set into a wet car. Covered above, and worth repeating: it is the single most common cause of a smell that seems to come from nowhere a fortnight later.
If it does not fit
It should. Every set is cut from a template taken off that specific make, model and year rather than trimmed down from a universal blank, so whichever pattern you choose is cut from the template for the car you select.
But if something is genuinely wrong — a manufacturing defect, a set that is not what you configured because of an error on our side, or damage in transit — tell us within 7 days of delivery with your order number and photographs. We assess it and then repair, remake or refund, and where the fault is ours we cover the return shipping. If a piece does not match your footwell, first check that the make, model and year on your order are the ones on your car, then contact us and we will resolve it. The refund policy has the full terms.
If your car is not in the list at all, that is a different conversation and a solvable one: we can take a new template from it. Start by selecting your vehicle on the product page and see what comes up.